Saturday, January 3, 2015

Filling The EveryTrail-Shaped Hole That’s Been Left In Your Heart

I usually stick to established, well-marked trails, but often that doesn’t work as well in the winter – especially after a snowstorm. I recently decided to snowshoe to the summit of Andesite Peak and thought I’d find someone who had done it and recorded it to EveryTrail and very literally follow in that person’s footsteps.

Imagine my surprise when I discovered that EveryTrail is no more, at least as an iOS app. And while there are similar trail apps available, none of them seem to have the extensive database of user-created paths that EveryTrail does – at least not yet. Once I found the path I wanted on the EveryTrail website, I used a little hack to get it onto my phone. Here are the steps in case you want to do the same:
  1. Log into your EveryTrail account on the website and download the .gpx file that you want to use to your computer. (You may want to give the file a descriptive name if it doesn't already have one.)
  2. Next, download the GpxNavigator app to your iOS device (it isn’t free – I believe it was $1.99).
  3. Connect your phone to your computer and open iTunes.
  4. Navigate to the File Sharing option in iTunes and select GpxNavigator.
  5. Click on Add... to import your .gpx file to the app.
  6. Open the app on your iOS device. You'll find the file in the Library folder. That's it!
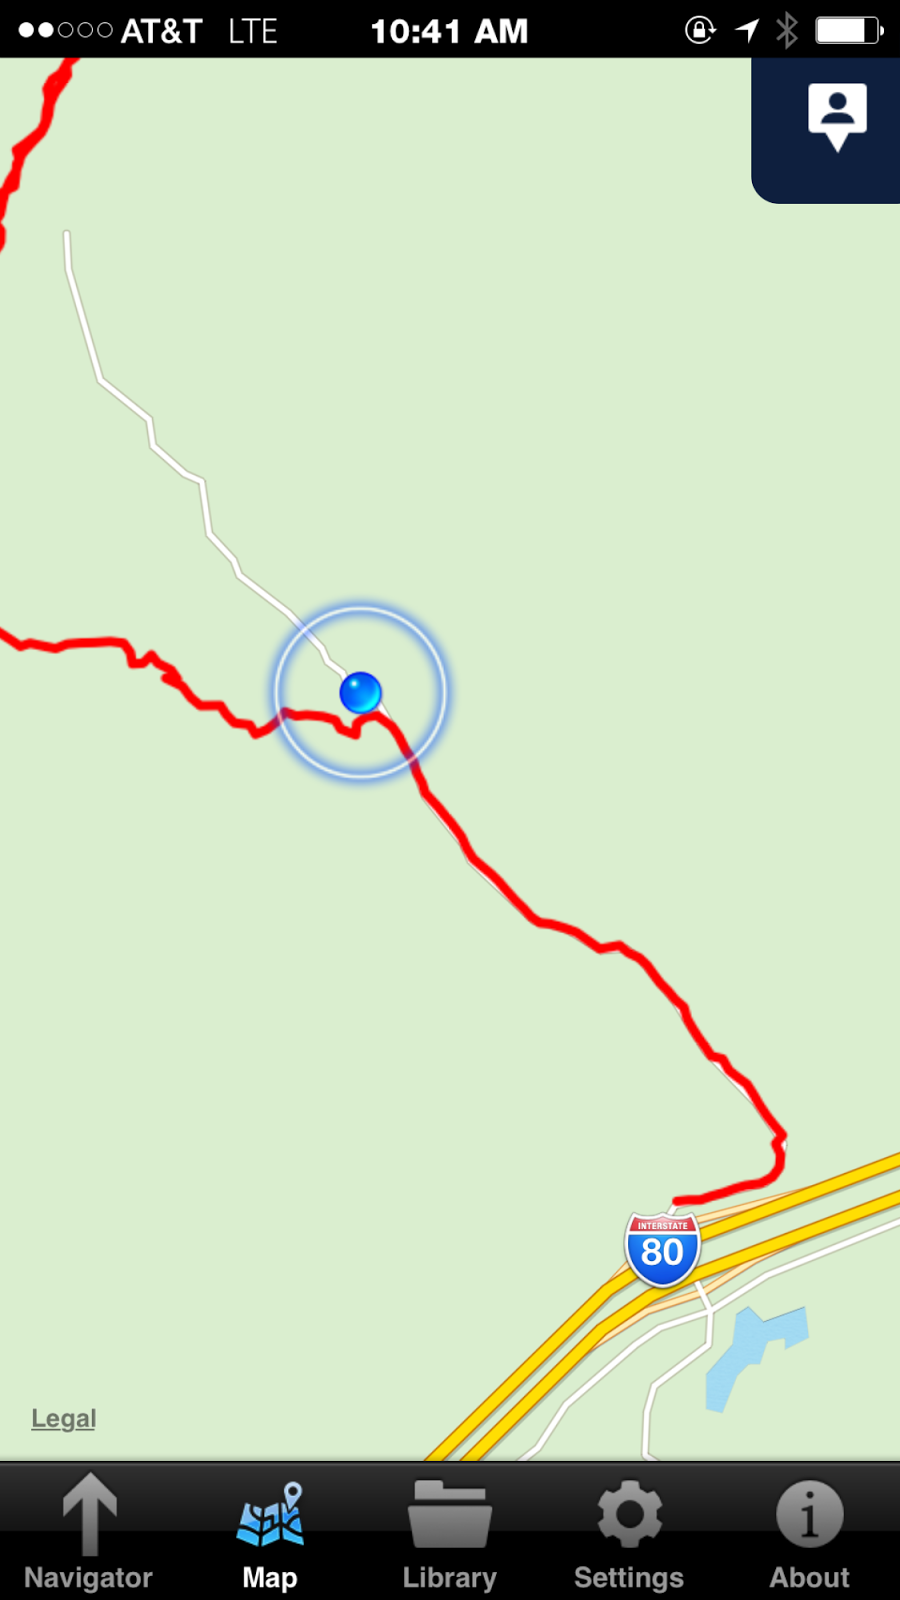
After opening the user-generated EveryTrail .gpx file for a hike in GpxNavigator, I was able to quickly see that I had missed my desired trail (indicated in red) in the snow.

I didn’t end up following the trail exactly, but having it provided me with good assurance that I hadn’t deviated too far off the beaten path. Until the other hiking apps catch up with EveryTrail in terms of user path availability, I will be using this option.

Have another app that you like to use? Share your favorite hiking apps in the comments!

Friday, April 25, 2014

Trail Report: Black Butte

Heading north on I-5, just as Mt. Shasta comes into view, there is something that looks a bit like a massive pile of dirt in comparison.

{via}
Turns out, this pile of dirt (which also happens to be a volcano that last erupted an estimated 10,000 years ago) has a trail that leads to its summit, from which you are awarded with fantastic views of both Mt. Shasta and Mt. Eddy. Mr. Petite Peaker and I chose this less-traveled hike for the tail end of our trip to the northeastern part of the state. (I'm doing circles around Mt. Shasta. Some day, I'll do the magnificent fourteener itself.)

This a short but steep trail, kept in the moderate range because it is only about 2.5 miles each way. For the first 1.5 miles or so, it will seem like you are slowly winding your way around the mountain, almost making an uphill spiral. Once Shasta is behind you, Eddy will come into view. Just as you start to wind back around, the trail turns steeply and becomes a series of switchbacks on the Shasta side of the mountain for the last mile or so. There are parts of this portion of the trail that could be called a class 2 rock scramble, though for the most part I'd label this hike "class 1 annoying." Make sure your ankles are strong and your footing is sure! (Also: avoid if you are an arachnophobe.)

One of the smoother parts of the trail, with a snow-covered Mt. Eddy in the background
(and a shorter peak on Black Butte)
At the summit, there is the foundation of what used to be a more complete fire lookout tower, long since airlifted away. The views are breathtaking, though the graffiti made me a bit sad. Leave only footprints, people. Leave only footprints.

Mt. Shasta
The final approach with Mr. Petite Peaker ahead of me
Yes, that's a 420 smiley face with a joint - we missed the memo

Monday, March 31, 2014

Trail Report: Mist Trail After A Snowstorm

A couple weeks ago Yosemite National Park announced that the Mist Trail had opened. With our current drought, this early opening wasn't too surprising - and I was thrilled! I could see via the webcams that both Half Dome and Clouds Rest still had snow on them, and I was eager to make my way to the top of one of these iconic landmarks and photograph the remnants of winter. (Yes, the John Muir Trail could have been an option earlier in the season, but nothing beats the scenery along the Mist.)

We planned our day hike and were set to go when the heavens opened up and dumped much-needed water and snow on the Bay Area and Yosemite. We opted to go anyway, but we had to alter our plan. For starters, rain and snow plus freezing temperatures meant that the Mist would be treacherous in the dark with potential ice-covered stone steps, so we had to scratch our plan to start from the trailhead before 5AM. We also didn't know what we would find higher up on the trail, so with the later leaving time and the unknown trail conditions, we had to resign ourselves to a plan to hike to the top of Vernal Fall, Nevada Fall, and ultimately into Little Yosemite Valley - but no Half Dome or Clouds Rest. I'm a weekend warrior and had to allow enough time at the end of our hike to drive home and get enough rest before work the next day.

Without the stress of needing to make it to the top of Half Dome or Clouds Rest, I found myself really enjoying this hike and taking time to stop and smell the roses - or, in this case, stop and enjoy the snow.

Along the only paved part of the trail, from trailhead to the Vernal Fall footbridge
Yosemite Fall from the bend in the trail
Oh my goodness. We left the trailhead around 7AM and were immediately greeted by an almost unfamiliar landscape, despite having done this trail more times than I care to count now. It is an entirely different experience after a snowstorm!

Mr. Petite Peaker crossing the Vernal Fall footbridge - and making fresh footprints!
Though the change of scenery was surprising, what was perhaps more so was the quiet. For our entire hike to the top of Vernal, we didn't run into a single hiker - completely unheard of for this trail! I'm not sure you could plan this time of solitude along the Mist Trail. Above Vernal we ran into a grand total of five backpackers before stopping for lunch in Little Yosemite Valley.

Vernal Fall makes its majestic appearance
The rising sun peeking through the trees at the top of Vernal
The steps up to the top of Vernal were a little icy but not any more slippery than they are when the waterfall is at its height. We made our way up and then continued along the Mist Trail to the top of Nevada.

Putting fresh footprints on the Nevada Fall footbridge and marveling at the back of a bright and snowy Half Dome showing us a sliver of its top
We seemed to be ascending with the sun! If you are familiar with how difficult some of those Nevada Fall steps are, you may think they seem even more difficult in the snow (and you'd be right).
Top of Nevada Fall
Sadly, after we lunched in Little Yosemite Valley, we opted to return via the John Muir Trail. This was a decision I knew we would have to make as we were ascending the tricky area to the top of Nevada, but goodness knows I still wanted to cry when Mr. Petite Peaker uttered those three words, "John Muir Trail." Though we plan on thru-hiking all 215 miles of it, I am not a fan of the JMT in this area. One blogger (I wish I remembered which one) likened taking the JMT instead of the Mist on the way down as "sacrificing your toes for the sake of your knees," which feels pretty accurate to me. 

That being said, the JMT was significantly easier on the toes since it was snow covered. And, there can be no question that the best views of Nevada Fall are from the JMT. 

Nevada Fall from the JMT
When we returned to the junction with the Mist, we found that rangers had closed down the Mist due to treacherous conditions. Also on our descent, we ran into many, many hikers on their way up the JMT to the top of either Vernal or Nevada, so we considered ourselves blessed to have left so early when the Mist was still open, the snow was still unmelted, and the trail was serenely devoid of other hikers.

We arrived at the junction to find our path up, the Mist Trail, closed - and the trees along it had totally shed their snow!
Right back where we started from: the Vernal Fall footbridge, some six hours after we started on this adventure, had replaced its snow with tourists
This was an amazing hike. I was reminded of the words of John Muir, who said that "In every walk with nature, one receives far more than he seeks." We planned this trip seeking to stand atop Clouds Rest; what we received instead was a blissful hike through familiar places made brand new to us. If ever you have the chance to hike through Yosemite after a snowstorm, don't pass it up!


Sunday, March 9, 2014

Success, Redefined.

I just finished reading Learning to Breathe by Alison Wright. While the book itself wasn't my favorite, Alison's remarkable story of recovery after experiencing what should have been a fatal accident is gripping at times, and she gleans some great lessons from her tragedy. Among her words of wisdom, this one probably screamed at me the loudest. I hope you find some inspiration from it, too.

Click on image to enlarge

Saturday, March 1, 2014

Trail Report: Kilimanjaro (Part 2)

I promise in Part 3 I'll get to the actual hiking experience, but I thought it was worth one more pre-climb post!

Arriving at the Kilimanjaro airport was a somewhat odd experience. It's actually a very small airport that accommodates huge international flights, mostly filled with hikers and safari-goers. Getting through the airport to our driver, Muslim, was a little chaotic!

On our first full day in Tanzania, Muslim picked us up around 10 in the morning and took is to meet Muhammad, the head of our hiking outfitter. What a huge hearted man! He told us of his daughter, who was born with a mitochondrial disorder. He would like to someday open a center for special needs children as there are currently no resources for parents like him in Tanzania.

Muhammad told us that the most important thing to leave Tanzania with isn't memories of the safari or the mountain, but gratitude for the infrastructure of our home country. Things like public restrooms, paved roads, and safe sidewalks are things that we take for granted but need to appreciate. Their presence ranges from inconsistent to nonexistent in Tanzania.

I thought of the difference between impoverishment and deprivation. I think surely Westerners must come to East Africa and take in what they label to be an impoverished society, when maybe the society is just deprived of many of the things that we claim we cannot live without. Maybe we are deprived, too - of things that the East Africans have - and we don't realize it. Maybe it is possible for both of us to be rich, and it has nothing to do with what we own and everything to do with what we have. I'm coming to learn that these two things are very different.

Women carrying bananas into Moshi to sell

Monday, February 24, 2014

Trail Report: Kilimanjaro (Part 1)

We returned from Tanzania about a week ago and my head is still spinning from the surreality of it all. I want to vomit some of these words up (because that's what it will be - vomited words, not graceful or lovely at all) before I lose them entirely, so here it goes.

Sometimes the biggest part of the journey is in the "getting there."

I am deathly afraid of flying. I couldn't even think about any mountains until I got through 24 hours' worth of flights. But oh, how strange life is sometimes.

On the longest leg of the flight, Los Angeles to Amsterdam, I was seated next to a young Jesuit priest from France.

Now, I have been to mass before. But this was my first up-close encounter with a be-collared priest. God does have a sense of humor!

Gregory was very friendly, wanting to communicate (probably to practice his English). He thought my name was Josephine. He made some niceties in English when I sat down, but I was feeling ill from the thought of what was to come. I am not a friendly flyer.

He spent the flight meticulously studying English over his laptop, entering words into a spreadsheet and reading their definitions carefully. But he was learning words like wholesome and rote, words that may be useful on paper but fail to roll off the tongue in everyday speech. I continued to look at his computer screen as he moved on to "truism" but he must have felt the weight of my eyes for he turned to me and said,

Josephine, ça va?

And I tell him I'm okay, but I don't tell him what I'm thinking: I'm better because your presence is strangely comforting. Because I know that "presence" and "comforting" are not on his carefully typed English spreadsheet as of yet.

And I drift peacefully to sleep.

Eventually I awake and he is eager to engage in more conversation. I learn that he has been in the Bay Area (and then Los Angeles) learning about the people, and in particular, evangelicals. (This makes me chuckle.) But something he said struck a cord with me. Little did I know how important it would be to carry this with me to Tanzania (and beyond):

Loneliness is the greatest poverty.

I was impressed with this string of English words, obviously contemplated as heavily as their content would suggest. He was speaking of his time in San Francisco, among the homelessness. But he wasn't speaking of their lack of material possessions. Gregory's eyes took on a sad expression and he repeated,

There is no poverty like that which comes from loneliness.

In Tanzania, I learned to look at poverty differently. I learned to avoid dismissing the people as "impoverished" by the standards of my First World, privileged existence. I learned that Kipling is alive and well when maybe he'd best be forgotten.

Where is Kilimanjaro in all of this? Closer and farther away than you might think. Stay tuned for Part 2 :)

Wednesday, February 19, 2014

10 Tips for Successfully Hiking Mt. Kilimanjaro

As one of the Seven Summits, Mt. Kilimanjaro is a very popular destination for mountain enthusiasts worldwide. It is the tallest mountain in Africa at 19,340 feet and the tallest free-standing mountain in the world. I was fortunate enough to be able to reach the summit recently. If you are preparing for the mountain, here are some tips, perhaps a few that are beyond those typically mentioned in guidebooks.

1. Know yourself. More specifically, know your weaknesses and prepare accordingly. Are your hands prone to getting cold? Then go ahead and invest in the warmest gloves available. Does the monotony of putting one foot in front of the other daily for 6-7 hours straight drive you mad? Then splurge on that solar charger so you can listen to music or audiobooks every day you're on the mountain. You'll be glad you did. This hike is tough enough without experiencing avoidable problems.

2. Flex those psychological muscles. You've probably been preparing your body physically for months, but it is nearly as important to prepare your mind. One think I would recommend is doing a six-hour hike starting at midnight. When Mr. Petite Peaker and I did this last year with Yosemite's Half Dome, I was shocked at how much more difficult it was. Obviously, the physical demands didn't change (aside from how the cooler temperatures impacted our bodies), but the mental challenge of just walking steadily up without seeing any of the scenery was enormous. Summit day on Kilimanjaro is torturous partially because of the darkness, but well worth it. Just be prepared.

3. Do your squats. There are no proper toilets on the mountain, and regardless of what route you take, you'll be on it a minimum of five days. If you take the Marangu route, you'll be using outhouses and holes in the ground and you'll be stepping through human feces in order to reach the place where you assume the squatting position. It is not a nice feeling to be stepping in feces and then feel your legs start to quiver in protest and threaten to give out on you. Be comfortable with the position and with using the great outdoors. (And my goodness, do try to aim!)

4. Water is oxygen. Well, not exactly. But drinking a lot of it can help prevent acute mountain sickness, or AMS. At the same time, you will most likely tire of it (and the flavor might be a bit strange). Bring drink mix packets to break up the monotony.

5. Don't hide your symptoms from your guides. They have done this trip dozens of times or more and they are truly experts. Many have been educated at a mountaineering school and all of them know the dangers of AMS, which can be life-threatening. Don't worry; they aren't going to force you to turn around if you have a small headache. It is in their best interest for you to make it. But let's be honest. People die on Kilimanjaro. Fortunately, it isn't often, but the day I summitted, a man died of heart failure trying to make the climb. Porters tried desperately to resuscitate him, to no avail. We saw another man being carried down on a stretcher and another one being carried by piggyback by a porter who was running as fast as he could down the mountain. These three events happened within a span of two days. This mountain is no joke. Take your symptoms seriously, tell your guides about them, and let the experts determine the degree of seriousness.

6. Define your own success. Reaching Uhuru may be your goal, but it isn't the only way to succeed. Reaching Horombo or Kibo is a fantastic accomplishment. Making it to Gilman's Point or Stella is a tremendous feat. And let me tell you something: As someone who is terrified of flying, my success story was written when I boarded a plane to Tanzania.

7. Know that the weather is unpredictable. Like most people who do the climb, I went during the dry season. Because the first vegetation zone you'll hike through is rainforest, I did have wet weather gear - but not enough. I wasn't expecting to get rained on in the moorland or trudge through mud in the alpine desert. I wasn't expecting a blizzard at the summit or a meter of snow to be dumped on Kibo. I got by fine without gaiters but could have used some additional socks and another pair of waterproof (not water resistant!) rain pants. My Ahnu snow boots worked well for the entire hike, and because they are taller than traditional hiking boots, my legs were better protected.

8. Protect your body's largest organ: your skin. The equatorial sun can burn you badly, and though it probably goes without saying, it doesn't matter whether it's cloudy or not. And as you ascend and the atmosphere thins, there's nothing to protect you from the worst sunburn of your life if you didn't self-protect by slathering on the SPFs. Likewise, if it is windy and cold at the summit, you will get a nasty windburn. (Ask me how I know.) A balaclava to protect your face while traveling through the snow is a must.

9. Pole, pole: Never hurry on Kilimanjaro. You'll probably hear the command "pole, pole" ("slowly, slowly") from your guide incessantly. It will probably be an easy command to follow at high elevations (when I heard this said to me during the final summit push I merely gasped, "Oh, don't worry!"), but you need to apply this mantra at lower elevations and on flatter areas as well. If you tire yourself out before the hard stuff, you'll lessen your chances of making it to the top.

10. Don't go from airport to trailhead. Most packages allow you the option of adding a safari either before or after your climb. I highly recommend doing this, and doing it upon arrival and before your climb. While you could be adventurous and do a camping safari (sleeping near ravenous lions! go you!), the rest and relaxation that a driving safari offers is a good way to recuperate from a long flight (24 hours in my case) and see more of Tanzania. Remember: Tanzania is more than a mountain. It is a beautiful country with many tribes and languages and cultures. Re-train your Western eyes to avoid judging "pastoral" as "impoverished." A French priest who sat next to me on the plane to Amsterdam (yes, God has a sense of humor) told me that loneliness is the greatest poverty of all. The Tanzanian people are (at least the ones I encountered) warm, welcoming, and persistently in the company of others. Don't insult the culture by seeing the mountain and not the people. Take time to enjoy the people before trekking up a pile of earth.

Sunday, January 5, 2014

Trail Report: Mt. Eddy

We are definitely in the midst of the hiking off-season, when high-elevation treks are generally impossible without ice axes and crampons. Since we have also had a very dry run in California, though, I thought it might be worthwhile to see if there were any modest peaks that might be possible to bag (without technical equipment) in preparation for our Kilimanjaro climb next month.

Enter Mt. Eddy, the highest peak of the Trinity Mountains in the Klamath range. This mountain is typically ignored in favor of its more famous (and impressive) neighbors, Mt. Shasta (the highest peak in the California portion of the Cascade range) and Mt. Lassen (the first peak over 10,000 feet that Mr. Petite Peaker and I bagged!), but at 9,025 feet, I thought it just might be doable in the (as-of-yet) drought conditions of this winter.

I found relatively little information about the Eddy hike online, and nothing about current conditions. Calls to Shasta-Trinity National Forest went unanswered. The Wikipedia entry for Eddy mentions "heavy snowfall," but when I researched the Mt. Shasta Ski Park, I found that it is currently closed due to lack of snow. So we packed our day packs in hopeful anticipation of a ten-mile hike and started our four-hour drive at 5:00 AM.

I pulled to the side of the road while on I-5 at dawn to capture the sky and the incredible formations of the migrating Canadian geese.
To reach the trailhead from I-5N (we were traveling from the San Francisco area), exit Edgewood-Gazelle (exit 751) and turn left onto Stewart Springs Road. The road was a little bit icy, but it was nothing compared to the ice and slush that awaited after we turned right onto Forest Road 17. (This is the road we were trying to contact the National Forest about; it can be closed in the winter due to icy or snowy conditions and such a closure would have made our trek impossible.) Continue uphill on this road for about ten miles to the trailhead.

At the trailhead, a Pacific Crest Trail (PCT) sign marks the trail, though there is no mention of Mt. Eddy. Head toward Dead Fall Lakes.

The easy first portion of the trail, headed toward Dead Fall Lakes.
The trail was an easy three miles to the first of the lakes, which was completely frozen and looked great for ice skating. We ran into three couples who were doing a loop around the lake; they then headed back and we ran into no one else on our way to the summit or on our return trip.

After passing by two more lakes (also frozen) higher up and several icy/snowy patches, we came across the summit trail junction (the first mention of Mt. Eddy) and made our final ascent. If I were to label the first three miles of this hike as "easy," I would categorize the remaining two to the summit as "moderately difficult," though I may have felt differently if there were no ice. There are frustrating switchbacks at the end, at a point where it looks like you could just jog straight up to the summit - but it's steeper than it looks, and I have no doubt that the switchbacks are helpful.

Mr. Petite Peaker throwing stones on the second frozen lake; yes, it's really solid!
The third and final frozen lake we encountered, with the summit in view.
Don't get discouraged at this point; though the summit looks to be a long way, it's less than two miles from here.
The first mention of Mt. Eddy. Shortly after this point, you'll reach the switchbacks of the final stretch.
The summit of Mt. Eddy was cold and windy, but snow free. (Snow could be seen on other parts of the summit ridge.) The view of Mt. Shasta was absolutely stunning, perhaps even more so because you don't get this view from the trail at all - you have to set foot on the summit for the tremendous payoff.

With our backs to Mt. Shasta, looking out at the ridge from the summit of Mt. Eddy.
That view!
Mr. Petite Peaker found the summit marker after I had given up hope that we'd find it.
Though stunning, Mt. Shasta also made me sad. It should not be so dry in January. We need some major snow and rain to come our way in the next few months!

Two musts for a great hiking trip: an incredible view and an even more incredible trekking partner.
The five-mile return trip to the trailhead was pleasant (though it felt long), and all in all this was a very worthwhile day trip and hike, especially at a time when there is little snow and my lungs were craving some heavy use.

Wednesday, January 1, 2014

Hello, 2014

We said goodbye to an incredible year and are looking forward to whatever 2014 may hold.

As the sun sets on another year, what are you looking forward to in the one that is to come?
(Photo taken from Muir Beach in Marin County, California on January 1, 2014)
I'm not big on resolutions (who keeps them, anyway?) but I do love the feeling of starting anew and thinking about goals for the next year. None of my wish list items for 2014 are material; they are all adventures. Some are already booked and on the calendar (we are headed to Tanzania to hike Mt. Kilimanjaro in February!) and some are awaiting warmer weather (Mt. Elbert and Telluride's Krogerata, both in Colorado and therefore conceivable road trips, are pretty high up on my list).

But I am reminded, time and time again, that beauty is in my own backyard, too. Whether you live in California (like I do) or Wyoming or Turkmenistan or anywhere else on this incredible planet, you need only open your eyes to take in the loveliness of nature.

And along those lines, more than any peak that I'd like to bag in 2014, I'd like to achieve more loveliness within. As I strive to spread more love to those around me and in my different spheres (home, work, play), I hope that this blog can be a place of inspiration and encouragement for any who may stumble upon it.

Wishing you 365 days of love, laughter, and beautiful landscapes.  

From the Muir Beach Overlook

Monday, November 25, 2013

Trail Report: Mount St. Helena

Poor Mount St. Helena. Put its name into a search engine and even Google is likely to ask you, "Did you mean Mount St. Helens?" But Helena, a little gem in Robert Louis Stevenson State Park, is well worth the drive (through beautiful wine country, I might add) if you are in the Bay Area and in search of a solid day hike.

The term "hike" may be a bit of a misnomer for some. The first mile or so of the trek could be considered a traditional hike, whereas the vast majority of it is simply a long uphill tromp on a wide fire road. Because this hike is typically ranked as difficult due to the elevation gain and distance (2,000 feet and just over 10 miles round trip, respectively), I was not looking forward to the journey nearly as much as the payoff: a killer view of the surrounding wine country, mountains, and greater Bay Area.

The trail, gently ascending along forested trail for the first mile, reaches the fire road at this point. It's all discouraging uphill from here, but well worth it!
I didn't find the hike to be too bad. It was a bit smoggy out, but temperatures were cool; this isn't a hike to attempt in the hot summer months. There was really no relief on the way up, but knowing the challenges of the trail going into it, I found that is was just a matter of putting one foot in front of the other...over and over and over again. We encountered rock climbers along the way and a natural rock formation that definitely provides us with reason to return in the future!

The Bubble, a popular rock climbing area about a half mile up the fire road.
Near the top you'll come to the summit plateau, which is surrounded by the five summits of Mount St. Helena. The highest of these is North Peak, and you've come this far - so you might as well go for this one!

View from the top of North Peak.
We made pretty good time, completing the entire 10.2-mile round trip hike in about four hours. It's a solid Bay Area peak to bag and one that is accessible to anyone in pretty good shape and willing to put forth the effort necessary. Would I do this one again? Probably not all the way to the top, but certainly to some of the rock climbing areas.

Friday, November 22, 2013

10...no, 6...Places I Would Love, Love, LOVE to Visit!

Linking up with A Happy Girl for her Blogember challenge. Day 22: 10 places you would love to visit. Of course this is a prompt that I am excited to do! I reduced the number to six because these are the six places currently far and away at the top of my list; there are about a hundred more that are much harder to choose between for those last four slots.

1. Persepolis, Iran
{source}
I think it might surprise people that the number one place on my list of places to visit isn't a mountain peak (though I would love to also trek through the Zagros Mountains), but I have wanted to visit Iran for as long as I can remember. I was an International Studies major with an emphasis in the Middle East, and although I learned Arabic (not related to Persian), I have even made my husband promise to take me to Iran before I die. Explaining this one might be a topic for another blog post, but suffice to say, sometimes you don't choose your adventures. They choose you. And Iran has had a firm grip on my heart for as long as I can remember, not only for its historical sites - such as Persepolis - but also for its modern culture.

2. Landmannalaugar, Iceland
{source}
Iceland seems to provide some of the most beautiful landscapes imaginable. After seeing a friend's photographs from his time there, I just can't imagine my life will be complete until I go.

3. Krogerata, Telluride, Colorado
{source}
The Krogerata is a via ferrata (iron road) that is accessible to even the most novice climbers. And what a backdrop you have as your make your way across the traverse! This is one that we have tentatively scheduled for June 2014 and I cannot wait.

4. Pichincha Volcano, Ecuador
{source}
Who doesn't dream of bagging a beautiful mountain peak that doubles as an active volcano? With its most recent eruption being in 1999, Pichincha affords its hikers (who must double as rock scramblers) with incredible views and the thrill of coming face-to-face with a natural force to be reckoned with. I can think of no better way to feel small and powerless!

5. Red Rock Canyon National Conservation Area, Las Vegas, Nevada
{source}
Red Rock represents a departure from the fast life of Vegas and a little piece of natural heaven. While others may want to indulge in all that the Strip has to offer, I dream of going there only to escape to a rock climber's paradise. There are multi-pitch routes here that are accessible to the beginner outdoor climber, but there are also opportunities to establish new routes and challenge yourself physically and mentally on difficult climbs.

6. Huashan Trail, China
{source}
Another via ferrata-style hike that has been dubbed "the most dangerous hike in the world" by some, though that has to be taken with a grain of salt. I've read some reports that the local people do this one like it's a walk in the park, but I imagine myself struggling, crying, and trembling from fear the entire time. Check out some of the scenery you could experience here.

What places would you like to visit?

Wednesday, November 6, 2013

App Review: MapMyHike+


Although today's Blogember challenge is to share your five favorite apps, I'm going to have to start with one - I am taking a class at my local REI that starts in an hour! (Have you checked out REI as a resource for learning about exploring the great outdoors?)
MapMyHike+ is a hiking tracker from the same company that produces MapMyFitness, MapMyRide, MapMyRun, MapMyDogwalk, and MapMyRun. (The plus versions of each of these apps are $2.99 for the iPhone; the standard versions are free.) With MapMyHike+, I am able to determine how many miles I hiked, get stats about speed and elevation gain, and refer back to my routes. MapMyHike+ also alerts me throughout my hike when I've reached a new mile mark and lets me know my average speed (cumulative for the hike).
I've used both EveryTrail Pro and MapMyHike+ to log my hikes over the past year; I've chosen to review MapMyHike+ here because it's been my go-to app more lately.
You can name your hikes (as I've done with the 8-mile Lassen Peak hike, below) or leave them unnamed; the app will still save your routes.


Accuracy varies, but that’s not due to the fault of the app itself. Without a GPS booster for your  mobile device, elevation and mileage tracking in more remote areas may or may not be totally correct. I have done hikes with EveryTrail and MapMyHike+ running simultaneously, and the results are comparable even in their inaccuracies. For example, the Lassen Peak elevation change seems to be fairly solid. On the other hand, the Upper Yosemite Falls hike is clearly misrepresented in the graph below (although when I showed the graph to Mr. Petite Peaker, he said, "Well shoot, that’s sure what it felt like!"). It was a steep hike, but we weren’t climbing any 90-degree cliff faces! Clearly I lost GPS signal at one point, and it was picked back up at the higher elevation. (And yes, my phone’s battery was depleted before making the return trip!)


In general, I like being able to look back at old routes and see what I’ve accomplished. An app like MapMyHike+ can provide just the right amount of inspiration for going out there and doing what you can. With the option to add comments to individual hikes, I can also mark my favorites and challenge myself to do previously hiked routes with greater speed.
My Lassen Peak hike in MapMyHike+ appears below with my Pinnacles High Peaks hike in EveryTrail Pro beside, for comparison. The latter fell victim to incredibly spotting GPS coverage, but you get the idea.
 

Everything recorded in the app also syncs with the MapMyHike website, which provides more detailed (and larger-screen!) information and statistics. (See below.) There is also a whole networking side to the app, similar to EveryTrail, which allows you to view others' hikes (and use them as guides if you wish) and share your routes with friends or the public.


The bottom line: Like a food diary, any type of exercise diary can provide motivation for developing healthy habits. If you are a hiker – casual or experienced – I recommend MapMyHike+ for tracking your routes. If you are serious about hiking and do a lot of it in more remote areas with poor cell or GPS signal, you may want to consider purchasing a device to boost your phone’s signal, as any tracking app will record inaccuracies without consistent service.


Tuesday, November 5, 2013

Post-Workout Protein Recipe: Avgolemono Soup (Egg-Lemon Soup)


I am once again linking up with A Happy Girl for her Blogember challenge. When it comes to sharing a recipe, I wanted to share something that is delicious AND great to have after a hike or gym session, especially during the colder winter months when you may be snow shoeing your way up mountains (or taking a lift up them and skiing or snowboarding down)! Try making some ahead of time and storing in a thermos to warm up later over a camp fire or in a cozy ski lodge or cabin.

My mother-in-law was an amazing woman who made her own cheese, kombucha (before it was a fad), soup, family clothes (including Mr. Petite Peaker's underwear - yes, I just went there - and snowboard pants), and more. 

Mr. Petite Peaker's parents lived on a farm. They were not wasteful people. Everything in their home, everything on their kitchen table, was wrought from their labor. From the first bite I had of this soup, I was in heaven and could taste the love. It was tangy, creamy (without a drop of cream!), soothing. My mother-in-law looked on with pride as I had seconds and then thirds. I noticed Mr. Petite Peaker wasn't eating his. "I've never liked this soup," he said. I think my jaw literally dropped to the floor, but I quickly recovered it and ate what was left in his bowl, too.

And with that, I'll offer a disclaimer that this soup isn't for everyone. Mr. Petite Peaker doesn't like it. I love it. My mother-in-law - who copied her recipe card for me that very night I had my first bite, not realizing that I would inherit her original card five years later - said it was one of her favorite soups. It's a MLL dish - Must Love Lemons.

Recent research has shown the benefits of consuming at least 10 grams of protein post-workout in order to promote muscle growth at a time (about 30 minutes post-workout) when your muscles are primed for it. Ideally, you want to have at least 20 grams, split into two - pre- and post-workout portions. This recipe is a protein-rich one, with both chicken broth and eggs. Because consuming carbohydrates post-workout helps slow the breakdown of protein and thus speeds muscle growth, the added rice (which could be replaced with orzo or something similar) allows you to kill two birds (no pun intended, though this is a chicken soup!) with one stone.

So without further ado, here is the recipe!

8 cups chicken broth [My mother-in-law made her own, of course...I used the cardboard box variety from the store!]
1/3 cup rice, uncooked
2-3 lemons
4 eggs [My mother-in-law's chickens hatched 'em when she made it...mine came from Trader Joe's hens.]
1/4 lb butter [8T; I used unsalted]
1/4 cup arrow root powder [I used flour]
salt and pepper to taste

I halved the recipe, which serves 6-8, because I knew I was cooking for one and I wasn't sure it would turn out well.

Here are the steps:
Melt the butter in a small saucepan...


and mix in the arrow root powder or flour.


In a separate large pot, bring broth to a boil, add rice, and let simmer for 10 minutes.


Lower heat. Add butter mixture to the broth and boil for about 5 minutes. Remove from heat.


Beat together eggs and lemon juice.


(I know - all of my mixtures are looking very yellow.) Now for the hardest part: tempering the eggs! Add a spoonful of the hot broth to the egg/lemon juice mixture and stir in thoroughly.


Repeat a couple times before adding the mixture to the broth, slowly to avoid scrambling the eggs. Then salt and pepper to taste.


That's it! Super simple, although I have to admit that I had a few bits of scrambled eggs in mine because I wasn't totally successful at tempering. But it tasted wonderful!

So how did I do? Well, Mr. Petite Peaker had a few bites to humor me and his response was, "This tastes just like Mom used to make. Now, where are the leftovers from lunch?" So while I wouldn't call this recipe a unanimous hit in my house, I would call it a universal success! It is so good - even more so because it makes me think of my mother-in-law. Give it a try!